Appearance
ScreenGrabbin' User Manual
Welcome to ScreenGrabbin', the lightweight, function-oriented screen capture tool designed to help you "Just Get Sh*t Done."
Getting Started
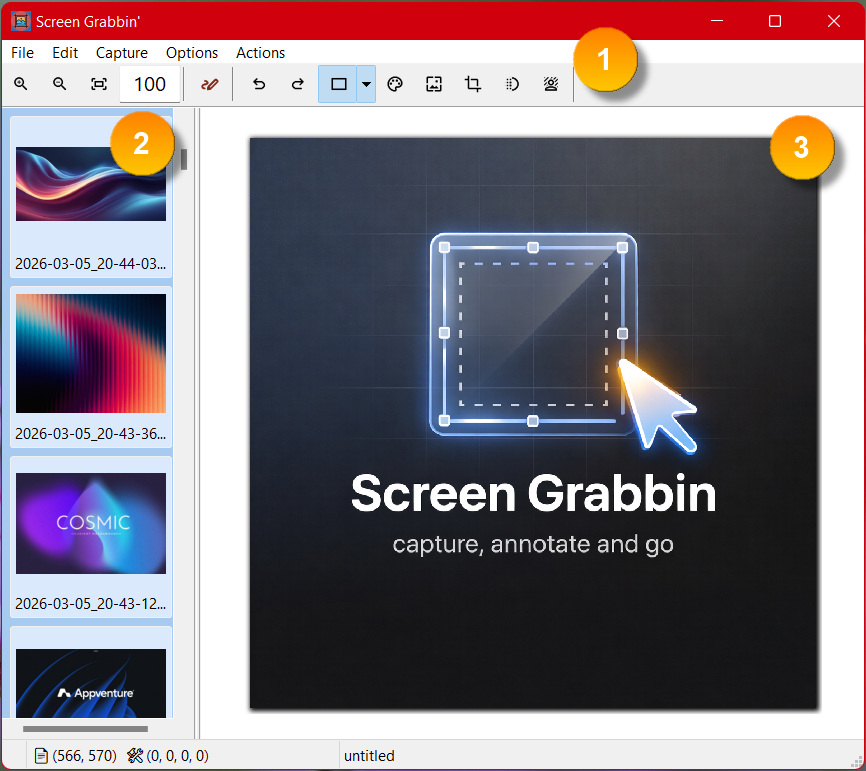
ScreenGrabbin' is designed to be in the way when you need it and out of the way when you don't. The application uses a simple, three-pane interface:
- 1. Toolbar: Access to all capture and editing features.
- 2. Left Pane: A thumbnail view of all your recent captures (cached images).
- 3. Right Pane: The full-view editor for the currently selected capture.
Capture Modes
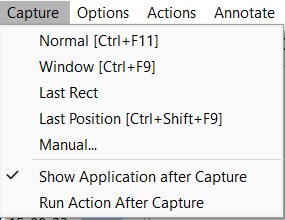
You can initiate a capture using the Capture menu or via global hotkeys (configurable in Preferences).
| Mode | Description |
|---|---|
| Normal | Standard click-and-drag to select a region. |
| Window | Automatically snaps to the closest window under the cursor. |
| Last Rectangle | Triggers a capture using the dimensions of your most recent selection. |
| Last Position | Triggers a capture at the exact position used in the most recent capture. |
| Manual | Allows you to specify the exact size in pixels before capturing. |
⌨️ In-Capture Controls
Once a capture operation has started, use these keys:
- H: Toggle crosshair lines on/off.
- ESC: Cancel the capture operation.
- SHIFT + Spacebar: Toggle the beginning/end of the capture area.
- SHIFT + Arrow Keys: Move the crop/capture position precisely.
- Mouse: Still usable to manipulate the region.
Editing & Annotation
ScreenGrabbin' features two primary editing modes. Note that switching from Annotate to Image mode will merge all objects into a single layer.
🖼️ Image Mode (Default)

This mode treats the image as a single flattened layer.
- Typical Enhancements: Adjust colors, brightness, contrast, and more.
- Resizing: Select the Edit Image icon to resize the physical image.
- Cropping: Click and drag to create a selection, then right-click for a Quick Crop.
- Formats: Save your work as PNG, TIFF, JPG, BMP, or ICO.
Edit Toolbar Reference

When working in image edit mode, the toolbar shown above provides these controls from left to right:
| Tool | What it does |
|---|---|
| Zoom In | Increases the preview magnification. |
| Zoom Out | Decreases the preview magnification. |
| Auto Size | Fits the image automatically to the available editor area. |
| Zoom % Box | Shows the current zoom percent. You can type a value directly, and double-click resets it to 100%. |
| Annotate | Switches into layered annotate mode. |
| Undo | Reverses the last action. |
| Redo | Reapplies the last undone action. |
The image-edit toolbar continues with these tools:
| Tool | What it does |
|---|---|
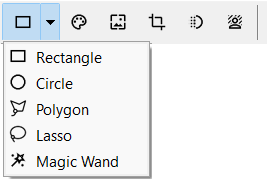
| Selection Mode | Enables selection-based editing. Use the drop-down to choose Rectangle, Circle, Polygon, Lasso, or Magic Wand. |
| Adjust Colors | Opens the color adjustment preview tools for brightness, contrast, and related corrections. |
| Edit Image | Opens the image editing preview tools for operations such as resizing and other direct image edits. |
| Crop to Selection | Crops the image to the active selection. |
| Pixelize | Obscures the selected area with a pixelation effect. |
| Remove Background | Starts the background-removal workflow for isolating the subject from the capture. |
Selection Tips
- Rectangle is best for standard screenshot crops and box selections.
- Circle is useful when isolating round UI elements.
- Polygon lets you click point-by-point around irregular shapes.
- Lasso supports freehand selection.
- Magic Wand selects adjacent pixels based on similarity.
🎨 Annotate Mode

Enter this mode by clicking the Annotate icon. This allows for non-destructive, layered editing.
- Layered Objects: Add text, rectangles, circles, arrows, and bubble captions.
- Independent Manipulation: Every object can be moved, resized, and modified independently.
- Non-Destructive Crop/Resize Workflow: Choosing Crop or Resize in annotate mode does not immediately commit the change. Instead, ScreenGrabbin' switches into a temporary canvas editing state so you can adjust the crop or size before applying it.
- Properties: Double-click any object to bring up the Layer Properties window where you can add effects like Drop Shadows, Glow, and Transparency.
- Background Manipulation: The capture itself is the background layer. To edit its properties, deselect all objects (Menu | Object | Deselect all) and click the Properties button.
- Copy Merge: Snap the current view (including all annotations) to the clipboard.
Annotate Toolbar Reference

In annotate mode, the toolbar shown above provides these controls from left to right:
| Tool | What it does |
|---|---|
| Delete Selected | Removes the currently selected annotation layer or object. |
| Rectangle | Creates an outlined rectangle. |
| Filled Rectangle | Creates a solid-filled rectangle. |
| Circle | Creates an outlined ellipse/circle. |
| Filled Circle | Creates a solid-filled ellipse/circle. |
| Line | Draws a straight line annotation. |
| Arrow | Draws a line with an arrow head. |
| Highlighter | Creates a highlight-style overlay for marking content without fully obscuring it. |
| Text | Creates a text layer. |
| Font | Opens the font picker for text annotations. |
| Line Width | Sets the border or stroke width for the selected object. If no object is selected, it updates the default width for the next annotation you create. |
| Border Color | Sets the outline color for the selected object, or the default outline color for new objects. |
| Fill Color | Sets the fill color for the selected object, or the default fill color for new objects. |
| Font Color | Sets the text color for the selected object, or the default font color for new objects. |
| Layer Properties | Opens the layer properties dialog for advanced settings such as effects and transparency. |
Annotate Control Tips
- Line Width can be typed directly or adjusted with the up/down spinner.
- Border Color, Fill Color, and Font Color all open a color picker when clicked.
- Right-click any color swatch to enter or choose a hex color value directly.
- Press
Ctrl+Clickon a color swatch to clear that color and set it to no color. - If an annotation object is selected, these controls modify that object immediately.
- If nothing is selected, these controls change the defaults used for the next object you draw.
Cropping and Sizing in Annotate Mode
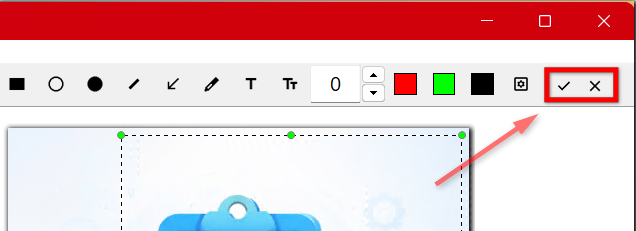
When you press Crop or Resize while in Annotate mode, ScreenGrabbin' switches into a dedicated canvas adjustment mode instead of applying the change immediately.
- This keeps the workflow non-destructive until you decide to commit the change.
- You can adjust the pending crop area or canvas size before finalizing it.
- Use the temporary confirmation buttons at the top-right of the toolbar to finish the operation.
- Click the checkmark to apply the crop or resize.
- Click the X to cancel and return without applying the change.
User Interface Shortcuts
- CTRL + Click: Select multiple thumbnails in the left pane.
- CTRL + Delete: Delete the selected item(s) from the cache.
- Right-Click (Left Pane): Select "Gather Selected" to merge multiple captures into a single annotation canvas.
Menu Reference
ScreenGrabbin' uses these top-level menus in the main editor window:
- File
- Edit
- Capture
- Options
- Actions
- Annotate
File Menu
| Menu Item | What it does |
|---|---|
| New... | Creates a new blank workspace or image canvas. |
| Open... | Opens an existing image file into the editor. |
| Acquire Image... | Imports an image from an acquisition source such as a scanner or compatible device. |
| Open Recent | Shows recently opened files for quick access. |
| Clear Recent Menu... | Clears the recent-file list. |
| Save... | Saves the current image or project content. |
| Save As... | Saves the current work to a new file name or location. |
| Save Selected to File... | Saves only the current selection to a separate file. |
| Print... | Opens print preview and print options. |
| Preferences... | Opens the application preferences dialog. |
| Support... | Opens the support entry point for the application. |
| About... | Shows version and product information. The About window also includes a Change License Information link for re-entering or updating your license details. |
| Exit | Closes ScreenGrabbin'. |
Edit Menu
| Menu Item | What it does |
|---|---|
| Undo | Reverses the last action. |
| Redo | Reapplies the last undone action. |
| Select All | Selects the entire image or all selectable content. |
| Unselect All | Clears the current selection. |
| Invert Selection | Inverts the current selection area. |
| Set Selection Size... | Lets you define an exact width and height for the active selection. |
| Cut | Cuts the current selection to the clipboard. |
| Copy | Copies the current selection or image to the clipboard. |
| Paste | Pastes clipboard content into the current image. |
| Paste as New | Creates a new image from the clipboard contents. |
| Copy Merged | Copies the current visual result, including annotations, as a flattened image. |
| Copy Full File Path | Copies the full file path of the current image. |
| Resize Image... | Opens the image resize dialog. |
| Change Color-bit Format... | Converts the image to a different color depth or bit format. |
| Rotate 180 | Rotates the image by 180 degrees. |
| Rotate Left | Rotates the image 90 degrees counter-clockwise. |
| Rotate Right | Rotates the image 90 degrees clockwise. |
| Flip Horizontal | Mirrors the image left to right. |
| Flip Vertical | Mirrors the image top to bottom. |
| Delete | Deletes the current selection or selected object. |
Capture Menu
| Menu Item | What it does |
|---|---|
| Capture Modes | The top part of this menu is built dynamically from the configured capture modes, such as Normal, Window, Last Rectangle, Last Position, and Manual. Each entry may also show its configured hotkey. |
| Show Application after Capture | Controls whether the main ScreenGrabbin' window is shown automatically after a capture completes. |
| Run Action After Capture | Controls whether a post-capture action or script runs automatically after capture. (see Preferences) |
Options Menu
| Menu Item | What it does |
|---|---|
| Merge Annotate Objects | Flattens annotation layers into the image. |
| Show Overlay... | Opens the overlay feature or overlay settings. |
| Stay on Top | Keeps the ScreenGrabbin' window above other windows. |
| Show Rulers | Toggles rulers in the editor view. |
Actions Menu
| Menu Item | What it does |
|---|---|
| Script Editor... | Opens the script editor for creating or editing Back-to-Basic action scripts. |
| Refresh | Reloads the available actions from the script folders. |
| Script Entries | Additional items are populated dynamically from the system and user script folders. Selecting one runs that script action. |
What Actions Are
Actions are customizable automation scripts written in BTB (Back-to-Basic).
- Users can create their own action scripts to automate repeated capture or image-processing tasks.
- These scripts can perform post-capture work such as saving, renaming, resizing, exporting, copying, OCR, or other custom workflows.
- The Actions menu is not limited to built-in commands. It is designed so each user can build a workflow that matches their own process.
- After creating or updating a script, use Actions | Refresh to reload the menu.
- The Script Editor is the main place to create and maintain these custom actions.
Annotate Menu
| Menu Item | What it does |
|---|---|
| Continue Adding | Keeps the current annotation tool active so you can add multiple objects without reselecting the tool each time. |
| Select All | Selects all annotation layers. |
| Deselect All | Clears the current annotation selection. |
| Select and Copy | Lets you select an area and copy the result. |
| Merge Layers | Merges the selected annotation layers into one layer. |
| Group Layers | Groups selected annotation objects together. |
| Ungroup Layers | Breaks a group back into individual objects. |
| Send to Back | Moves the selected annotation behind other layers. |
| Bring to Front | Moves the selected annotation in front of other layers. |
| Send Backward | Moves the selected annotation back by one layer step. |
| Bring Forward | Moves the selected annotation forward by one layer step. |
| Crop | Enters annotate-mode crop adjustment. The crop is not applied until you confirm it with the toolbar checkmark. |
| Resize | Enters annotate-mode size adjustment. The resize is not applied until you confirm it with the toolbar checkmark. |
| Load from Template | Loads a saved annotation template. |
| Save as a Template | Saves the current annotation setup as a reusable template. |
| Reset Object Settings | Resets the default annotation object settings. |
Status Bar
The status bar at the bottom of the main editor window shows three pieces of information:
| Area | What it shows |
|---|---|
| Left Panel | A * appears when the current image has unsaved changes. If there are no pending changes, this area is blank. |
| Middle Panel | Shows image and selection details. The first pair is the full image size, and the second set is the current selection or object bounds. |
| Right Panel | Shows the current file name or working name, such as untitled for a new image. |
Status Bar Details
- The image portion reflects the full canvas size.
- In image mode, the second set of numbers reflects the current bitmap selection rectangle.
- In annotate mode, the second set of numbers reflects the selected layer or annotation object bounds.
- If nothing is selected, the selection or object values show as zero.
- A new unsaved workspace typically shows
untitledin the file-name area.
Left Pane Context Menu
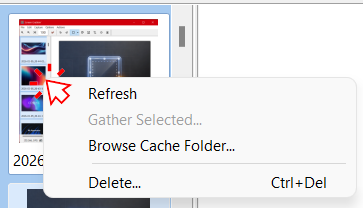
When you right-click an item in the left thumbnail pane, ScreenGrabbin' shows a context menu for managing cached captures.
Refresh
- Reloads the thumbnail list from the cache.
- Use this if the left pane does not appear to match the current contents of the cache folder.
Gather Selected...
- Combines the currently selected cached captures into a single working canvas.
- This option is only useful when you have selected more than one capture in the left pane.
- It is intended for cases where you want to assemble multiple screenshots before annotating or saving the result.
Browse Cache Folder...
- Opens the cache folder in Windows File Explorer.
- Use this when you want direct access to the stored image files outside of ScreenGrabbin'.
Delete...
- Removes the selected cached image or images from the cache list.
- Keyboard shortcut:
Ctrl+Del - Use this to clean up captures you no longer want to keep in the local cache.
License Information
If you need to re-enter, replace, or update your license information, open File | About... and click Change License Information.
- This opens the software activation dialog.
- Use it to update the registration name and license key for the current installation.
Preferences
Access File | Preferences... to customize your experience.
Capture Tab
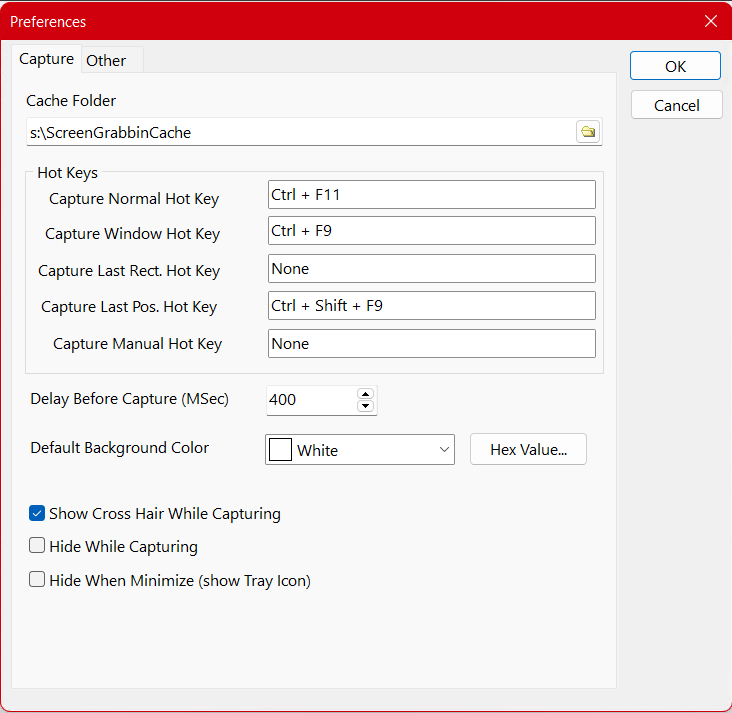
- Cache Folder: The directory where ScreenGrabbin' stores cached captures. In the provided example, this is
s:\ScreenGrabbinCache. - Capture Normal Hot Key: Starts a standard rectangular selection capture. The screenshot shows
Ctrl + F11. - Capture Window Hot Key: Starts window capture mode so you can select a specific application window. The screenshot shows
Ctrl + F9. - Capture Last Rect. Hot Key: Repeats capture using the most recent rectangle size and position. The screenshot shows this as
None, which indicates no shortcut is assigned. - Capture Last Pos. Hot Key: Repeats capture using the last saved capture position. The screenshot shows
Ctrl + Shift + F9. - Capture Manual Hot Key: Starts manual-size capture mode. The screenshot shows this as
None, which indicates no shortcut is assigned. - Delay Before Capture (MSec): Wait time, in milliseconds, before capture begins after the command is triggered. This is useful for opening menus or arranging the screen first. The screenshot shows
400. - Default Background Color: Sets the fill color used when a capture or canvas needs a default background. The screenshot shows
White, and theHex Value...button provides an explicit color entry option. - Show Cross Hair While Capturing: Displays crosshair guides while selecting an area. Enabled in the screenshot.
- Hide While Capturing: Hides the main ScreenGrabbin' window during capture so it does not appear in the result. Disabled in the screenshot.
- Hide When Minimize (show Tray Icon): Sends the application to the notification area instead of leaving it visible on the taskbar when minimized. Disabled in the screenshot.
Other Tab
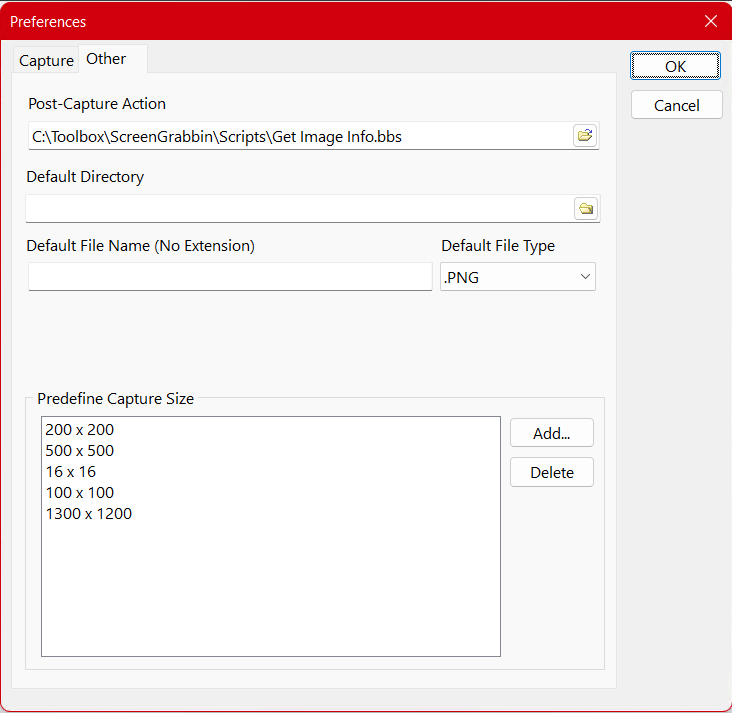
- Post-Capture Action: Path to a Back-To-Basic script or action file that runs automatically if Run Action After Capture is checked after a capture completes.
- Default Directory: The folder used when saving captures by default. The browse button lets you choose a folder.
- Default File Name (No Extension): The base file name ScreenGrabbin' uses when saving output. The extension is controlled separately by the file type setting.
- Default File Type: The default format used for saved captures. The screenshot shows
.PNG. - Predefine Capture Size: A list of reusable fixed-size capture presets for manual capture mode. The screenshot includes examples such as
200 x 200,500 x 500,16 x 16,100 x 100, and1300 x 1200. - Add...: Opens a dialog to create a new predefined capture size entry.
- Delete: Removes the currently selected predefined capture size from the list.
Advanced: BBS Scripting
ScreenGrabbin' supports Back-To-Basic (BBS) scripting for automation.
- Post-Capture Script: Specify a script file to run automatically after a successful capture.
- Functions: ScreenGrabbin' exposes built-in image and editor commands to BTB scripts for capture post-processing and workflow automation.
- Integration: Perfect for uploading to custom servers or complex batch processing.
Screen Grabbin Script Commands
These commands are handled directly by the ScreenGrabbin' editor when a BTB action script runs against the current image.
Function-call syntax rules:
- Parameters must be enclosed in parentheses, such as
UNDO()orCOPY(true). - If a function takes no parameters, you still call it with empty parentheses.
- String parameters should be quoted, such as
RESIZE("p", 540, 467).
| Command | Syntax | What it does |
|---|---|---|
RESIZE | RESIZE(<type>, <width>, [height]) | Resizes by scale when <type> is "s" or by exact pixels when <type> is "p". Examples: RESIZE("s", 0.75, 0.54), RESIZE("p", 540, 467). |
SAVE | SAVE([filename], [merged]) | Saves the current image. If merged is true, annotation layers are flattened before saving. |
PIXELFORMAT | PIXELFORMAT(<mode>) | Converts the current image. Supported modes are true, 256, gray, and bw. |
GETSEL | GETSEL(<value>) | Returns a selection bound where <value> is "l", "t", "w", or "h" for left, top, width, or height. |
SETSEL | SETSEL(<left>, <top>, <width>, <height>) | Creates a bitmap selection rectangle at the specified coordinates. |
CROP | CROP() | Crops the image using the current selection. |
COPY | COPY([merged]) | Copies the current image or selection. merged is optional and defaults to true. |
UNDO | UNDO() | Reverses the last editor action. |
SAVEUNDO | SAVEUNDO() | Saves an undo state for objects and layers before a larger scripted change. |
REDO | REDO() | Reapplies the most recently undone action. |
REFRESH | REFRESH() | Refreshes the editor and cache views. |
MERGE | MERGE() | Merges all layers in the active image into a flattened result. |
INFO | INFO(<value>) | Returns metadata where <value> is "w", "h", "format", "name", "cachename", "cachefolder", or "userdata". |
SAMPLE | SAMPLE(<x>, <y>) | Returns the pixel color at the specified bitmap coordinates. |
OPEN | OPEN(<filename>) | Opens an image file into the ScreenGrabbin' editor. |
Command Details
RESIZE
Use RESIZE("s", <width>, [height]) to resize by scale or RESIZE("p", <width>, [height]) to resize by pixel dimensions. The third parameter is optional.
Supported resize types:
"s"resizes by scale where1.0means100%"p"resizes by pixel dimensions
Examples:
RESIZE("s", 0.75, 0.54)RESIZE("p", 540, 467)
ScreenGrabbin' uses bicubic resampling and marks the image modified after a successful resize.
SAVE
SAVE([filename], [merged]) writes the current image to disk. If filename is omitted, ScreenGrabbin' attempts to save using the current working file name. If merged is true, the output is flattened before it is saved.
PIXELFORMAT
PIXELFORMAT(<mode>) converts the active image format. Supported modes are:
truefor 24-bit color256for 8-bit palettized colorgrayfor 8-bit grayscalebwfor black-and-white ordered dithering
GETSEL and SETSEL
Use GETSEL("l"|"t"|"w"|"h") to read the current selection bounds. Use SETSEL(<left>, <top>, <width>, <height>) to create a bitmap selection rectangle from a script before running functions like CROP(), COPY(), or image adjustments.
CROP
CROP() applies a crop using the active selection.
COPY
COPY([merged]) sends the current selection or image to the clipboard. The merged parameter is optional and defaults to true.
COPY()copies using the default merged behaviorCOPY(true)copies a flattened result including annotationsCOPY(false)copies without forcing a merged result
UNDO, SAVEUNDO, and REDO
These commands let scripts participate in the editor undo stack:
UNDO()reverses the last changeSAVEUNDO()records an undo point for objects and layersREDO()reapplies the last undone change
REFRESH
REFRESH() redraws the main image view and cached-image view after a script changes the current workspace.
MERGE
MERGE() flattens all layers in the active image, saves an undo point, copies the merged result to the clipboard, and exits annotation mode.
INFO
INFO(...) returns information about the current image and workspace:
| Query | Returned value |
|---|---|
INFO("w") | Current image width |
INFO("h") | Current image height |
INFO("format") | Current bitmap pixel format |
INFO("name") | Current working file name |
INFO("cachename") | Current cache file name |
INFO("cachefolder") | Cache folder path |
INFO("userdata") | ScreenGrabbin' base data folder |
SAMPLE
SAMPLE(<x>, <y>) reads a pixel directly from the current bitmap canvas and returns the color value.
OPEN
OPEN(<filename>) loads an image file into the editor. If a file name is supplied, ScreenGrabbin' first checks for unsaved changes before replacing the current image.
Notes for Script Authors
- These commands are ScreenGrabbin'-specific and are intended to be used from BTB action scripts that run inside the application.
- Query-style functions such as
GETSEL(),INFO(), andSAMPLE()return values back to the script. COPY(true)andMERGE()are the functions to use when you need annotations flattened into the final output.SAVE()without a valid current file name can fail, so scripts should usually provide an explicit file path.SAMPLE()reads raw bitmap coordinates and can fail if the script passes coordinates outside the image bounds.
Manual Version 5.0.0.0© 2026 Chalard LLC